

Popular Posts
-
 Connecting the Dots. Love and Loss. Death. - Steve Jobs Source: Stanford University I am honored to be with you today at your commencement f...
 -
 This week I'm happy to announce, not just a discount to BB8 readers but an actual GIVE away. FREE stuff. One of my favorite resources ...
 -
One of the great and terrible things about being a newspaper photographer is the idea that you never know what your day is going to bring. S...
-
 Not everyone has access to their own in-house team of professional illustrators to create stunningly beautiful lighting diagrams. For those...
 -
 I have been getting a new type of assignment over the last few months that I would have never anticipated even a year ago: Shooting corporat...
 -
Last in this series we looked at Riaz, lit entirely by flash against a darkish wooden wall. At left is Brett, who was lit right where he sat...
-
 Antes que todo, reciba usted mi agradecimiento a través de la distancia por preferir nuestras colecciones de imágenes gratuitas. En esta oca...
 -
 Ya está aquí la segunda parte de nuestra serie ' fotos e imágenes muy bacanas '. El término ' bacano ' se utiliza mucho en p...
 -
 A través de 20 fotografías , le invito a conocer una de las más grandes tradiciones mexicanas. Me refiero al Día de Muertos o Todos Santos ...
 -
 Photo © Syl Arena I'm on the road with spotty 'net (and also a Nikon guy, so there's that). But Syl Arena has been playing aroun...
Friday, October 30, 2009
Wednesday, October 28, 2009
Brain Food: Three New Offerings
Over the last two weeks, three new educational items of interest have popped up on the radar. There are new video tutorials from Dave Honl and JoeyL, and John Harrington has evolved his Best Business Practices book into a magnum opus, 500+ page second edition.
More on all three, and which ones may or may not be for you, inside.
__________
Best Biz 2.0
 Harrington's new edition of his book is far more than your typical update. He basically recast the book to reflect the changing landscape of the business of photography. Also included is a first-person walk-thru of a full I.R.S. audit.
That's right, John took one for the team. And thanks to him you now have a pretty detailed version of exactly what to expect when they come knocking. (Kinda the financial equivalent of a cavity search.)
And, of course, you get a Harrington-esque game plan for wading in and riding it out. (John, for the record I hope this was just happenstance. Because if you asked for the audit just to write about it, you are insane.)
There's lot more new stuff, too. The book is half-again bigger than the first edition, which was already no slouch.
John and I are not always in agreement on how we approach things from a monetary/business point of view. But do not let that fool you. If you are a pro shooter (or are considering becoming one) you should absolutely buy this book. I have updated the review of the first edition with a second-edition topper and more details, here.
Thanks, John, for the tremendous effort you clearly put into this major update. It's 523 pages of CYA for less than $25.00. This book is a must-have for any working -- or prospective -- pro.
Dave Honl's Light Fare
 Next up is a 2-DVD set from David Honl, who designed the entire line of HonlPhoto snoots, grids, gobs, speed straps, etc.
Watching this, I almost got the impression I was watching a photo-version of HGTV. Dave has friends in Hollywood, which really helps when it comes to putting together a DVD set.
And like HGTV, it is not so much a hard-nosed tutorial as it is a roadmap/confidence builder, allowing you to be a voyeur as they work. Essentially, it's a low-pressure, learn-by-watching romp through a series of small-flash shoots. Dave uses his line of light modifiers (along with some other items) but gets full credit for not turning the video into an infomercial.
Through the video you hang out with Dave and (Babylon 5 star) Claudia Christian as they bounce from small-flash shoot to small-flash shoot. They even do a food segment -- cooking, shooting and eating with USA Today shooter Bert Hanashiro.
The focus is more light placement and light shaping than nuts-and-bolts, f/stop-naming exposure balance techniques. And he is assuming some familiarity with the process. Most of his shoots use three speedlights (his go-to setup) and various small light shapers.
Much like I do, Dave shoots from the hip in manual mode with respect to exact metering, etc. Basically you will follow as he starts off with an ambient exposure, knocks it down, and builds it back up with light. It is a tried-and-true formula, and he works it well. The takeaway is not so much the exact process as a general confidence builder on how quick and easy this gets to be with a little practice. And he does go back and diagram each shoot as he finishes it.
The pace is quick, bouncing from shoot to shoot, with the exception of a 20-min talk-and-shoot with Christian and fellow Babylon 5 co-star Bill Mumy. I am not much of a TV watcher, so the 15-min talk before the shoot was kinda lost on me. But Dave then did a nice job of knocking down a very bright ambient room only to build it back up with sculpted light.
Here's a quick preview:
David Honl LIGHT is a two-DVD set that will play as a video on your computer or in your regular DVD player. It is $39.95 and available in many photo retailers, or on the web, here.
JoeyL's Full Mind Dump

First of all, don't let the bombast and photo rap songs fool you. It's all a branding head fake. Joey Lawrence is one of the smartest, most focused, centered and talented people I have ever met. And the fact that he is all of this at 19 years old just pisses me off.
When I first sat down with "Sessions with JoeyL," I sort of expected a higher-volume version of the Photoshop and shooting tutorial he released last year. What it turned out to be completely surprised me. It is a full rundown of his workflow, thinking, shooting methods, pre-planning, lighting, post-production -- everything.
A little perspective: Most people would have gotten a pretty swelled head to get the assignment to shoot the Twilight movie poster stills. He did it as an 18-yr-old. And even then, he primarily saw it as a way to finance his trip to the Ethiopian hinterlands.
That trip is a vehicle for the Sessions videos, as Joey uses it as an example for lots of various tutorials about everything that surrounds his shooting process. But there is lots more, too.
The sessions are broken into five categories: Lighting theory, photo shoots, business, travel and Photoshop.
In lighting theory, he has separate lessons on vision, basic and advanced techniques, tools and modifiers. His light is fairly simple when it comes down to it -- it is just a part of a holistic approach to building interesting photos. And he treats it as such. And frankly, thinking of light as only one of many good tools and qualities with which you make pictures is a good thing.
In the next session, takes you along on five different shoots -- a magazine shoot, an advertising shoot, two bands and a model test. Lots in here -- lighting, subject interaction, theory, etc. It is all very fluid, and for the most part uses big lights.
In the business section he goes at length into his business practices (which, BTW, differ somewhat from those of John Harrington, above) and also includes examples of how he builds trust both with his clients and his subjects.
The latter is a thread all through the sessions. Seriously, can you imagine the pressure of working on some of his shoots -- for some of his clients -- as a teenager? Honestly, I would think it is quite a handicap in the eyes of many of the people around him. He just assumes that he will have to work a little harder -- and faster -- to gain their trust on set.
In travel, he uses the Ethiopia trip to walk through how he approaches travel, gear, logistics, finding a guide, getting off the beaten path, etc.
Lastly, the Photoshop section is not as layer-blending specific as was his first tutorial video. He mixes general and specific techniques, including how he got his luminous tonal ranges from the Ethiopia photos. (I assumed that was a Phase One thing, and was very pleased to see that it was more of a post-processing technique.)
The sub-sections in Photoshop are: Compositing, using color curves, swapping skies, using blending modes, black and white conversions, tonal colorizing and fixing blown highlights.
Here is a very short preview, which honestly does not begin to cover the depth of the 4-hour sessions:
Ready for the catch? (There's always a catch.)
It is expensive. It is $300 (actually, $250 until November 1st, and further reduced to $200 if you have purchased his previous tutorial.)
That is a lot of money. And the $300 question is, of course, is it worth it?
Here's the thing. I can't tell you that. Well, scratch that -- I can tell you this: Whether these sessions are worth the money depend entirely on what you will do with them.
If you are just looking for 4 hours of "teach me how to be JoeyL" entertainment, I will say that there are a lot of things that you can do with half a day and $300 that will be more entertaining.
But if you truly take what he is trying to teach you to heart -- and use it to try to close the gap between what you are doing and what he is doing -- then it is cheap.
To his credit, my constant feeling during the entire series was that he appears to be holding nothing back. What you see is what you get. It is a full and sincere attempt to help people to see how he thinks and works, and to aspire to that level.
And I will also say that I am about 100% sure that he will not be blowing the proceeds of this video on liquor and women, as would many a 19-year-old I have known. For those of you who can afford it, I would consider it not only an investment in yourself as a photographer but also an investment in a future project for a young man who is trying to make an impact in the world before he is old enough legally drink.
Sessions With JoeyL is available as a data download or as a data DVD ROM. It runs only on your computer in a browser format and will not play in a standard DVD player on your TV. More info, including how to purchase, is here.
[UPDATE: JL just added a promo code for the readers of this site (no commission or anything like that coming to me) to extend the discount, which was set to expire just a few days after this post. Use the code "SESSIONSSPECIAL03636" (no quotes) when ordering to get the discount.]
More on all three, and which ones may or may not be for you, inside.
__________
Best Biz 2.0
Harrington's new edition of his book is far more than your typical update. He basically recast the book to reflect the changing landscape of the business of photography. Also included is a first-person walk-thru of a full I.R.S. audit.That's right, John took one for the team. And thanks to him you now have a pretty detailed version of exactly what to expect when they come knocking. (Kinda the financial equivalent of a cavity search.)
And, of course, you get a Harrington-esque game plan for wading in and riding it out. (John, for the record I hope this was just happenstance. Because if you asked for the audit just to write about it, you are insane.)
There's lot more new stuff, too. The book is half-again bigger than the first edition, which was already no slouch.
John and I are not always in agreement on how we approach things from a monetary/business point of view. But do not let that fool you. If you are a pro shooter (or are considering becoming one) you should absolutely buy this book. I have updated the review of the first edition with a second-edition topper and more details, here.
Thanks, John, for the tremendous effort you clearly put into this major update. It's 523 pages of CYA for less than $25.00. This book is a must-have for any working -- or prospective -- pro.
Dave Honl's Light Fare
Next up is a 2-DVD set from David Honl, who designed the entire line of HonlPhoto snoots, grids, gobs, speed straps, etc. Watching this, I almost got the impression I was watching a photo-version of HGTV. Dave has friends in Hollywood, which really helps when it comes to putting together a DVD set.
And like HGTV, it is not so much a hard-nosed tutorial as it is a roadmap/confidence builder, allowing you to be a voyeur as they work. Essentially, it's a low-pressure, learn-by-watching romp through a series of small-flash shoots. Dave uses his line of light modifiers (along with some other items) but gets full credit for not turning the video into an infomercial.
Through the video you hang out with Dave and (Babylon 5 star) Claudia Christian as they bounce from small-flash shoot to small-flash shoot. They even do a food segment -- cooking, shooting and eating with USA Today shooter Bert Hanashiro.
The focus is more light placement and light shaping than nuts-and-bolts, f/stop-naming exposure balance techniques. And he is assuming some familiarity with the process. Most of his shoots use three speedlights (his go-to setup) and various small light shapers.
Much like I do, Dave shoots from the hip in manual mode with respect to exact metering, etc. Basically you will follow as he starts off with an ambient exposure, knocks it down, and builds it back up with light. It is a tried-and-true formula, and he works it well. The takeaway is not so much the exact process as a general confidence builder on how quick and easy this gets to be with a little practice. And he does go back and diagram each shoot as he finishes it.
The pace is quick, bouncing from shoot to shoot, with the exception of a 20-min talk-and-shoot with Christian and fellow Babylon 5 co-star Bill Mumy. I am not much of a TV watcher, so the 15-min talk before the shoot was kinda lost on me. But Dave then did a nice job of knocking down a very bright ambient room only to build it back up with sculpted light.
Here's a quick preview:
David Honl LIGHT is a two-DVD set that will play as a video on your computer or in your regular DVD player. It is $39.95 and available in many photo retailers, or on the web, here.
JoeyL's Full Mind Dump
First of all, don't let the bombast and photo rap songs fool you. It's all a branding head fake. Joey Lawrence is one of the smartest, most focused, centered and talented people I have ever met. And the fact that he is all of this at 19 years old just pisses me off.
When I first sat down with "Sessions with JoeyL," I sort of expected a higher-volume version of the Photoshop and shooting tutorial he released last year. What it turned out to be completely surprised me. It is a full rundown of his workflow, thinking, shooting methods, pre-planning, lighting, post-production -- everything.
A little perspective: Most people would have gotten a pretty swelled head to get the assignment to shoot the Twilight movie poster stills. He did it as an 18-yr-old. And even then, he primarily saw it as a way to finance his trip to the Ethiopian hinterlands.
That trip is a vehicle for the Sessions videos, as Joey uses it as an example for lots of various tutorials about everything that surrounds his shooting process. But there is lots more, too.
The sessions are broken into five categories: Lighting theory, photo shoots, business, travel and Photoshop.
In lighting theory, he has separate lessons on vision, basic and advanced techniques, tools and modifiers. His light is fairly simple when it comes down to it -- it is just a part of a holistic approach to building interesting photos. And he treats it as such. And frankly, thinking of light as only one of many good tools and qualities with which you make pictures is a good thing.
In the next session, takes you along on five different shoots -- a magazine shoot, an advertising shoot, two bands and a model test. Lots in here -- lighting, subject interaction, theory, etc. It is all very fluid, and for the most part uses big lights.
In the business section he goes at length into his business practices (which, BTW, differ somewhat from those of John Harrington, above) and also includes examples of how he builds trust both with his clients and his subjects.
The latter is a thread all through the sessions. Seriously, can you imagine the pressure of working on some of his shoots -- for some of his clients -- as a teenager? Honestly, I would think it is quite a handicap in the eyes of many of the people around him. He just assumes that he will have to work a little harder -- and faster -- to gain their trust on set.
In travel, he uses the Ethiopia trip to walk through how he approaches travel, gear, logistics, finding a guide, getting off the beaten path, etc.
Lastly, the Photoshop section is not as layer-blending specific as was his first tutorial video. He mixes general and specific techniques, including how he got his luminous tonal ranges from the Ethiopia photos. (I assumed that was a Phase One thing, and was very pleased to see that it was more of a post-processing technique.)
The sub-sections in Photoshop are: Compositing, using color curves, swapping skies, using blending modes, black and white conversions, tonal colorizing and fixing blown highlights.
Here is a very short preview, which honestly does not begin to cover the depth of the 4-hour sessions:
Ready for the catch? (There's always a catch.)
It is expensive. It is $300 (actually, $250 until November 1st, and further reduced to $200 if you have purchased his previous tutorial.)
That is a lot of money. And the $300 question is, of course, is it worth it?
Here's the thing. I can't tell you that. Well, scratch that -- I can tell you this: Whether these sessions are worth the money depend entirely on what you will do with them.
If you are just looking for 4 hours of "teach me how to be JoeyL" entertainment, I will say that there are a lot of things that you can do with half a day and $300 that will be more entertaining.
But if you truly take what he is trying to teach you to heart -- and use it to try to close the gap between what you are doing and what he is doing -- then it is cheap.
To his credit, my constant feeling during the entire series was that he appears to be holding nothing back. What you see is what you get. It is a full and sincere attempt to help people to see how he thinks and works, and to aspire to that level.
And I will also say that I am about 100% sure that he will not be blowing the proceeds of this video on liquor and women, as would many a 19-year-old I have known. For those of you who can afford it, I would consider it not only an investment in yourself as a photographer but also an investment in a future project for a young man who is trying to make an impact in the world before he is old enough legally drink.
Sessions With JoeyL is available as a data download or as a data DVD ROM. It runs only on your computer in a browser format and will not play in a standard DVD player on your TV. More info, including how to purchase, is here.
[UPDATE: JL just added a promo code for the readers of this site (no commission or anything like that coming to me) to extend the discount, which was set to expire just a few days after this post. Use the code "SESSIONSSPECIAL03636" (no quotes) when ordering to get the discount.]
::ann wood handmade::
I felt this to be the perfect week to share with you these exquisite pieces by artist Ann Wood.

The owls, with wonderful names like, "Iago", "Mr. Guppy", "Pecksniff", "Rodrigo" and "Henchard" are made using found, vintage bits of Japanese boro textiles, paper mache´, Victorian bodice fabrics, Vintage buttons, World War I army blankets, even vintage threads. All are stuffed with wool and stand approx. 9"
 I love this photo, depicting one of the owls in mid-creation. He looks as though he's wearing a monocle!


 These are just amazing. And, mostly sold, but you can get on Ann Wood's mailing list to be notified of updates. It's well worth hopping over to her site just to see the full breadth of her work.

The owls, with wonderful names like, "Iago", "Mr. Guppy", "Pecksniff", "Rodrigo" and "Henchard" are made using found, vintage bits of Japanese boro textiles, paper mache´, Victorian bodice fabrics, Vintage buttons, World War I army blankets, even vintage threads. All are stuffed with wool and stand approx. 9"
 I love this photo, depicting one of the owls in mid-creation. He looks as though he's wearing a monocle!
That face! and check out those talons. incredible.


 These are just amazing. And, mostly sold, but you can get on Ann Wood's mailing list to be notified of updates. It's well worth hopping over to her site just to see the full breadth of her work.
Tuesday, October 27, 2009
International Missions Convention: Here I Come!
Last year was my very first International Missions Convention and I wasn't wrong that I went and joined.
It was a life changing convention.
International Missions Convention is an annual convention sponsored by our Main Church in Manila. I believe last year was the second one. This friday will be the third one!
And YES! I am joining! Woohoo! I am so excited and I am so expectant for wonderful things to happen to my life this whole weekend.
I will be blogging about everything I'll be learning day after day for the whole two-day convention. SO you wouldn't need to worry, the WORD I'll receive, I'll pass on to you. Surely it will bless you as well.
Here's a video from last year's International Missions Convention held in Manila:
Those who are from Manila, Philippines, email me at yourdailyword@gmail.com if you're interested in joining this convention! Hope to see you there!
Let me pause here first as I need to pack things up. I'll be leaving early tomorrow!
Blessings to you all! Continue to be hungry for God!
a foolish costume is the hobgoblin of little minds
 Why don't kids wear homemade costumes anymore? What's cuter than the scene where Scout's wearing her giant ham costume? If you answered this,
no need to continue reading. I can remember seeing The Dime Store window filled with boxes of costumes. The kind with the plastic eye-less faces staring out from the cellophane window. The one piece , non-flame retardant, tie in the back costume, folded up beneath. Row after row of "Princess", "GI Joe", "Hobo" {'Hobo' how's that one for, vintage non-PC. These days would you really feel good about sending your kid down the street as 'homeless guy'?} , "Gypsy", "Clown" vacant, holes staring back at me. This may have been the beginning of my DIY attitude. Because even back then, holding my mom's hand as we'd walk by, staring back over my shoulder I'd think to myself, "I can totally make that. And so much better"
.........................................................................by the way, if you can get your hands on this book:
Do. It's a classic by Louis Slobodkin {'The 100 Dresses' } I ended up with the copy that was in our family, growing up. I still bring it out every year. Wonderful illustrations and story. ............................................................................

whoa. careful there, fella.

But I digress, let's get back to the matter at hand. At our house, I'm declaring this the year of the no-store-bought-costumes. I'm tired of parents feeling the need to shell out major money for a COSTUME to be worn ONE night {oh, ok and maybe in the school parade } I sort of want to be hard core and tell every kid that comes to my door, no candy if your parents paid some ridiculous price for that costume { from halloween express or any of those mail order catalogs encouraging your daughters to look like hookers} but then I realize that's more about the parents than the kids.
 Above: my mother's masterful work . She made the entire costume, wig and all by hand. { That's red electrical tape wrapped 'round my tights - clever } And the she did the same for my 4 other siblings.
So in the spirit of DIY and Halloween being the ultimate holiday of self expression, this year, get creative. Make-up can go miles {look at little skeleton boy up there}, Goodwill can be a design lab of great ideas. This year, think out side that little cellophane box.
A Filthy Language Primer, Courtesy Chase Jarvis
At first glance, this appears merely to be a very cool behind-the-scenes look at the high-speed flash shooting Chase did last month in New Zealand. Lotsa high-tech flash talk, impossible sequences, killer pics -- yadda, yadda, yadda.
But the real takeaway here is of the etymological variety.
To wit, the adjective "sick." Which, of course, means "good." (Back in my day we went with the much less confusing "bad" when we meant "good.")
But what if something is really sick. As in, sicker than sick? That calls for the word, "filthy."
And if it is filthier than filthy, then of course you'll want to go with, "nasty."
More, including resulting pix, diagrams, and the obligatory lively discussion in the comments, at Chez Chase. I am heading over to read it now, as I sit down for lunch with a slice of filthy, nasty pizza. Which is prolly gonna make me feel sick…
-30-
Suzanne Kasler on The Skirted Round Table

This week designer, author, Suzanne Kasler drops by The Skirted Round Table. Another great interview with a great talent. Ms. Kasler's newest book, 'Suzanne Kasler, Inspired Interiors' is a topic of conversation as we each go through and discuss our favorite rooms in the book. If you don't have the book already, I recommend it. Kasler has an innate sense of color and balance that throws all rules out the window, keeping an interior fresh, full of movement and continuity.

I chose the farm house photos to discuss with her. I love the play of the rough-hewn structure against the fine antiques, art and textiles. { That green velvet sofa! } Now this is the way a mountain house should look in my book. Not a Navajo blanket in the place. anyway, go listen, I think you'll be every bit as inspired and enlightened as we were.
The Prayer of A Righteous Man Availeth Much
"Confess your faults one to another, and pray one for another, that ye may be healed. The effectual fervent prayer of a righteous man availeth much."
James 5:16 (KJV)
Just after shift a while ago, I with my boss and co-workers visited a friend's mother who has been hospitalized. This friend of mine to give you an idea a very jolly person. A friend who is always able to make you smile and make things a little not too serious.
Honestly, I was expecting that same kind of person when we arrived at the hospital. But I was wrong. I found my friend crying and sobbing beside her ailing mother. Now that tells me how serious the situation was.
She then started telling us about her mother's condition. Her sickness really started with Diabetes and then became complicated. Complications that made her blood pressure and sodium in her body go up. I then learned that her mom haven't awaken since Saturday. She has also greatly lost weight from the last time (and the only time) I saw her.
We then started empathizing and comforting our friend with taps on the back, hugs and we even tried to crack some jokes to lighten the mood. I know this is a very difficult situation in her life.
Deep inside me, I really wanted to pray for her mother and my friend's family. But there's something that's stopping me from doing so. I'm not sure if it's shyness or fear of rejection or I don't know. But while we were there, there was a battle inside me whether to pray or to just shut up.
Praise the Lord! He won! I said it! I asked everyone if we can pray and WE DID!
Now this is the reason why the title of this post is "The Prayer of A Righteous Man Availeth Much". It is actually my declaration that my prayer for comfort, healing, hope and love from the Lord Jesus to the family be answered. It is my faith that my prayer be heard and be "effective" for God's glory! Not that I consider myself righteous because of me. Absolutely not! But that I consider myself righteous by the blood of the Lord Jesus Christ, my mediator to God!
With that faith, I know that my prayers have been heard and answers are already coming. But this is also a great opportunity for all of you my dear readers to pray with me for my friend's family and her mom for miraculous healing, financial provision and that their hearts be filled with God's love and comfort through HIS WORD! Remember that when two or more people agree, God shall open the windows of heaven.
Please take time to remember them in prayer. May God bless you always.
Monday, October 26, 2009
Blog Out Loud + Design Within Reach
Date: 11.04.09
Where: DWR/Tools For Living - 332 Santa Monica Blvd, Los AngelesWho: YOU!!!
Where: DWR/Tools For Living - 332 Santa Monica Blvd, Los AngelesWho: YOU!!!
If you're in Los Angeles next week, we'll be teaming up with Design Within Reach/Tools for Living for another Blog Out Loud event!
For those of you unfamiliar, we {co-founder Rebecca Orlov of Apartment Therapy and loving.living.small} loved the idea of creating a blogging symposium for people share their ideas and experiences.
By putting the idea out there, we've watched it grow and blossom on its own, and with that has come a fantastic group of sponsors, panelist and friends.

again we have a fantastic line-up of panelist:
Emily Goligoski of
The SanFranista and Notes On Design
Gregory Han of
Apartment Therapy& Unplggd
Laure Joliet of
Apartment Therapy, At Home At Home & Dwell
Alissa Walker of
Gelatobaby, Fast Company, GOOD
Haily Zaki of
American Express OPEN Forum, Curbed LA, Inhabitat & Secret Agent PR
**We'll be pouring Frey organic and biodynamic wines www.freywine.com and serving light appetizers. So come mingle with friends and fellow bloggers!
Let me know if you're coming, I'd love to meet you in person
accessorizing
 photo: domino
I'm a little late at getting this up as we have another FANTASTIC interview with interior designer, Suzanne Kasler in post editing, as I type this. But if you get a chance, hop over to The Skirted Round Table where last week we discussed accessorizing. Lots of comments ensued, thank god we all have our own point of view on design. The Skirted Round Table.
i heart skinflint

Rare 2 arm wall mounted machinists work light with original paintwork and vitreous enamelled shade by "Mek Elek.


Green and white enamelled factory lights by "Coolicon." Vitreous enamelled spun steel with original company label and vents to permit uplighting. Circa early 1930.

Opaline pendants, salvaged from school buildings in the midlands, UK. Circa 1950.
 Polished brass and glass naval bulkheads by Pauluhn, Houston, Texas. Salvaged from US cargo ships in India. Circa 1950.
Sunday, October 25, 2009
Let Christ Be Revealed | You'll Come by Hillsong United | MM
Here's a song from Hillsong United that has touched my heart so deep.
The message I received while listening to this song (and singing) is found in the bridge part.
"Chains be broken
Lives be healed
Eyes be opened
Christ is revealed"
It just reminds us that it takes for us to be set free or a better way of saying it is it takes for us to know that we've been set free! It takes for our lives to be healed from anger, hatred, disappointments and sin. It takes for us to open our eyes to understand what God has been doing and His purposes instead of focusing on the NOW!
Because by doing so, Christ is REVEALED through our lives!
Listen to the song and share to us what God has spoken through this song.
You'll Come by Hillsong United
(Hosea 6) Brooke Fraser 2007
Verse 1
I have decided I have resolved
To wait upon you Lord
My rock and redeemer shield, and reward
I'll wait upon you Lord
Prechorus
As surely as the sun will rise
You'll come to us
As certain as the dawn appears
Chorus
You'll come let your glory fall
As you respond to us
Spirit Rain, flood into our thirsty hearts again
You'll come.
Verse 2
We are not shaken we are not moved
We wait upon you Lord
Mighty deliverer triumph and truth
We wait upon you Lord
As surely as the sun will rise you'll come to us
Certain as your word endures.
CHORUS
Bridge
Chains be broken
Lives be healed
Eyes be opened
Christ is revealed
Lyrics: 6lyrics
Ray Flash vs. Orbis vs. AlienBees ABR800 Review, Pt. 1
 Ring light has, for me, gone from a curiosity to what I consider to be an essential part of my lighting kit. I do not always use it when lighting people, but I always bring it. And I frequently end up using it -- but rarely as a main or only light.
 In this first of a two-part series comparing ring flashes, we'll be taking a look at the two direct competitors in the bunch: The Ray Flash and Orbis ring flash adapters. The ABR-800, in all of its different iterations, will get its own post next week.
As most of you already know, the Ray Flash and Orbis are not actually ring flashes but rather are passive light modifiers that convert your existing speedlight into a ring flash. This process has advantages and disadvantages, and there are also relative strengths and weaknesses between the two.
The straight dope, inside.
__________
A Little Background
I have been planning this post for awhile, as one of a pile of "evergreen" type posts that I keep tucked away for a rainy day. In the interim, Dave Honl and Bert Hanashiro over at SportsShooter came up with a video of their own comparing the three.
It's fantastic in that it shows the relative size and ergonomics of each. It sucked (yeah, bros, I'm calling you out) in that it did not really get very deeply into the most important facet: What does the light look from each like in an apples-to-apples comparison?
I kid -- mostly.
But long story short, Dave and Bert's video is a good 4-minute primer on seeing how they each work. So if you have not seen that video yet, I would suggest watching that first. You know, to save me some typin'. (Note: They used a Zeus, which is the ABR800 equivalent in a pack-and-head configuration. Same difference.)
It is here. I'll wait.
__________
Leading Off: The Ray Flash
 The Ray Flash mounts to your camera with the flash attached on the hot shoe. The camera, flash and Ray Flash all become one unit.
 At first, you'll worry that it puts too much pressure on your shoe-mount flash foot. That has never been a real issue, tho. And it does flex a little and takes some getting used to in general. But the latter is true for any ring flash.

Here is how it mounts, which should be pretty self explanatory.
And if you have trouble holding these guys, the studio versions will only feel clunkier and heavier. This is as light as it gets. There is a physical learning curve to dealing with these, but it is worth the effort.
The Ray Flash is available here (or at many other camera stores around the world) for $199.95.
…followed by: The Orbis
 The Orbis Ring Flash Adapter, which also sells for $199.00 (available here directly, and many other places locally) is similar to the Ray Flash in that it channels your speedlight's output into a ring of light. But the similarities end there.
The Orbis mounts from under your lens, with the flash stuck up inside it. Normally you would connect it to your camera with an off-camera TTL cord (not included, but something many DSLR shooters already own.)
Your choices until now have been to hand-hold it or to use a light stand, both of which have advantages. But it could not fuse with the camera to make a single unit like the Ray Flash.
That changes with the upcoming release of the Orbis Arm, shown below:

I have played with a production model and have found it to be built like a tank -- a very lightweight tank, thankfully.
It is thick, rigid, powder-coated aluminum. And the two, double-screwed L-brackets are solid as a rock. I would note that, like the Ray Flash, there is some flex involved in the end. But that comes from the Orbis' connection to the flash head, and is in no way related to the Orbis Arm.
I have found it to be adjustable to any camera/lens combo. (I marked mine w/Sharpie to assemble it exactly to the right distance every time.) And it folds into a "spooned L" shape that fits into your bag without taking up any appreciable room. Nice design.
Stepping into The Ring
So, there are the basics for each one. From here on, it is Orbis against Ray Flash -- and may the best ring light win.
Which one will you like best? That depends. Because as similar as they are, they stack up totally differently depending on how you prioritize their features and qualities. So let's get to Round One.
Light Efficiency
Winner: Ray Flash
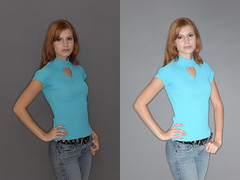 Here is an apples-to-apples comparison. Everything is the same except for the adapter used to mod the light.
On the left is Orbis. On the right, Ray Flash. Neither are optimal because I left them flat and split the difference on the exposure.
Some tests were, IMO, subjective. This one wasn't. If you are working with closed down apertures, low ISO, or outside, give the Ray Flash a good look.
But even with the increased efficiency, neither of these are overpower-the-sun machines. For that, you'll want an ABR800. You can fill with the speedlight models, but you cannot dominate the sun outdoors in full daylight.
That said, the vast majority of the time you will be working with these kinds of lights in moderate and/or controlled ambient light levels. And they both are more than sufficient for indoor use.
Exposure-wise, it is also worth noting here that both will pass through the TTL information -- it is just your normal flash after all -- and can be used with high-speed focal plane sync for wide aperture work. Gels are also a breeze to use with either. Just gel the flash as you normally would.
Universal Fit
Winner: Orbis
Again, no contest. The Orbis fits most every camera/speedlight combo (except for big honkers like Vivitar 285's.)
The Ray Flash is camera and flash specific. You need a different model number for variances in camera depth (prosumer or pro-sized body) and flash. And brand.
If you shoot with the same model camera(s) and flash(es) all of the time, this is a non-issue. Otherwise it is something to consider.
As a small consolation, I have found that I can mount an SB-800 on a D3 with the Ray Flash model meant for the SB-800 and D300. But it is a little off center on the vertical axis.
Run and Gun
Winner: Ray Flash
First, it comes ready to rock without the added bracket. And even considering the bracket on the Orbis, the Ray Flash is a more compact, self-contained setup.
If you are working in a pack of photogs, the Ray Flash is going to be a little tighter and more compact. This follows through to packability, too. The Ray Flash is thinner and smaller, but inherently "L-shaped". And FWIW, I have found that I can usually work that "L" around a corner somehow in a bag.
But that size efficiency comes back to bite you when it comes to …
Quality of Light
Winner: Orbis
Okay, this is one of those "IMO" types of things, as quality of light is subjective.
But the physics add up. The Orbis, being bigger and less efficient, also appears to be softer and more even in it's light distribution. This is a design point, and Ray Flash just went for more compactness and efficiency.
But being subjective, let's go to the example pics so you can judge for yourself.
 Here is the Ray Flash pic. And these are both as apples-to-apples as I could make them. Just one ring light and a gray wall. And Dasha, of course.
 It makes since that, since the Ray Flash is smaller it is going to produce a little harder light quality. Just physics. But, you get efficiency and compactness back in return.
It is my opinion that there is also some "lensing" going on in the Ray Flash, which means that you are going to get a bit of vignetting if you shoot wide with it. It is more efficient, in part, because it is somewhat of a "zoomed" ring flash.
This is something that is not very apparent in these two comparison photos, which were shot with a portrait length lens. But you can see it in a wide-angle lens shot, as in this example.
 And here's the Orbis, in the same conditions as the shot above.
Right off of the bat I get a little softer shadow on the wall, which is obviously the result of a bigger lighting surface area. But in addition, the light is less "lensed" in the design of the Orbis, so it is also more evenly distributed around the circle. (Again, this will mostly come into play with shorter focal length shots.)
The Orbis is a softer, more even light. And thus, a little more flattering. And as I said, that comes back to bite you on the butt when it comes to lighting efficiency. You choose the factors that are more important to you.
Both are Better as Fill
Actually, let me be more clear: Any ring light is better at fill. So while the Orbis may win out on single-light quality, I do have to say that I rarely use ring lights this way.
 Take this picture of Dasha, done at the same time with the Orbis.
In this setup, the Orbis is acting as a fill to a gridded SB-800 coming in from camera right high. This is where I think the Orbis, the Ray Flash and just about any other ring light (or adapter) shines.
Using a ring for what is essentially contrast control is where the fun is, because the ring actually allows you to be more edgy with the design of your key light and take more chances. I see it as being sorta like "layer blending" in Photoshop. Except for you do it in camera.
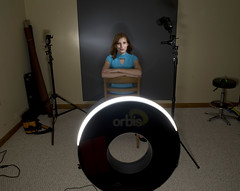 Because some will ask, here is the setup shot for the photo above. I just popped out of the ring (it was on a stand) and shot from above.
 You can see how simple this is, but the result looks very sharp. And, depending on the fill level of the ring and the angle of the key, can give you a thousand different final looks.
The splash of light on the background also hides the effect of the ring light back there if the key light doesn't reach that far back. Which would be the case in this setup, probably.
__________
So there you have my best effort at a comparison between the two main, speedlight ring adapter contenders. It should be noted that there are some others, too, which are essentially cheap knockoffs of one of the above designs.
But a warning to those who would save a few bucks: Just because someone's ring light platic mold might have "fallen off of the truck" does not mean they went out and coughed up the bucks for the best internal optics materials.
In fact, if they were going for low price, they almost certainly did not spend that money. I have had reports of several tests of the various cheaper "Ebay ringflash adapters," and have heard stories so varied on color consistency (um, not) and hideous efficiency (including one report of a six-stop light loss) that I am not even gonna go there.
Look, if you want a super cheap ring light, just DIY your own from one of many different designs here and elsewhere. Save your marginal dollars for another flash.
Next week, get ready to go into full retina burning mode with the 320 watt-second AlienBees ABR 800 monobloc ring flash. We'll be doing comparisons there too -- same conditions as above, so you can compare all three. And with its various included and a la carte attachments, the ABR is a pretty variable light source in its own right.
Comments? Questions? Hit us below.
Next: Ray Flash vs. Orbis vs. ABR800 Pt. 2
PocketWizard Wraps Up Canon RF Noise Problem
If you have purchased (or are considering purchasing) one of the new PocketWizard TT5/TT1 remotes for the Canon system, keep reading.
If not, save the electrons ...
__________
Surprised by not only the magnitude but the variable nature of radio frequency interference put out by some of the Canon flashes, PocketWizard has addressed the Canon flash RF issues with the release of the AC5 RF Soft Shield.
It's basically an RF-blocking cloth shield which muffles the Canon flash noise and allows the TTL/HS sync-capable remote units to do their thing. It was a Canon-specific design problem, and there were reports of signifcant levels of interference from some Canon flash owners.
Today's news is that PW is going a step further and making the AC5 shields available for free.
It was a rough hand to get dealt, from an engineering/design standpoint. But kudos to PocketWizard for doing the right thing and making them available gratis. The offer goes live today, and runs through Jan 31, 2010.
Future units are reportedly going to include the AC5's in the box according to Mark Wallace at Snap Factory, for whom we also have to thank for the range demonstration video shown above.
Sign-up page for your free AC5 is here. And check out Mark's post for more specific info on range and reliability.
Friday, October 23, 2009
Living A Routine Life?
Are you living a routine life?

Heres' the LIFE God has prepared for us!
John 10:10 (The Message)
"I came so they can have real and eternal life, more and better life than they ever dreamed of."
Now you choose...

Thursday, October 22, 2009
circus violet


Quite possibly some of the most charming porcelain pieces I've come across yet. Studio Violet is the collaboration of artists, Camilla Engman and Elisabeth Dunker.
Wednesday, October 21, 2009
On Assignment: Weed Eaters
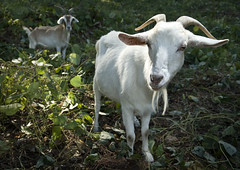
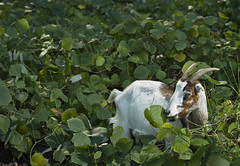 I spent Tuesday afternoon shooting a fleet of all-terrain mowers in Herald Harbor, MD.
 Using goats instead of herbicides to clear land is growing in popularity, especially where runoff and watersheds are involved. And you have to admit, it is a pretty cool way to clear a monster patch of kudzu that has taken over a cliff.
__________
Brian Knox is the supervising forester for Eco-Goats, a Davidsonville, MD company that specializes in ecologically friendly land clearing. Okay, so the goats do a lot of the work. But Brian takes care of them, moves the temporary fences and is a much more articulate spokesperson for the business than are his charges.
If you have the right kind property to be cleared, it is a smart way to go. Not only does it save herbicides getting into the ecosystem, but it is low-carbon. The goats are just recycling the carbon in the topsoil biomass rather than burning petroleum.
Heck, Google does it, and they are the smartest people I know.
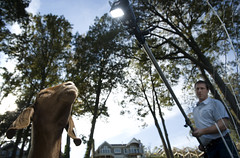
 We were out in the afternoon on a clear day, with sun raking over a kudzu-covered cliff that acted as our backdrop. For this wide shot and the picture up top, we used two speedlights -- one on-axis for fill and another on a voice-activated boom. The "VAB" in question was Erik Couse, who also helped out on a shoot for Rivals.com earlier this season.
I exposed for a rich-looking ambient, then keylit with Erik's flash and filled with an SB-800 in a Ray Flash. I used a Ray Flash rather than an Orbis this time, as the Ray Flash is a little more efficient.
They both have their relative strengths, as I have been finding out while shooting with each. I have a two-part, in-depth comparison slated to begin next week.
In this case, Erik's SB-800 was high and camera right, and set on 1/4 power. You can see how it hits Brian's face and also sculpts the goats from high up. It is doing the same thing in the photo up top, only the ratio to the ambient is a little tighter so the light is less dramatic. When shooting closer to the ambient and lighting from a high angle, the look is more of a crisp, 3-D feel than anything else.
 Here is Erik in action, showing just how easily he can drop that flash in just about anywhere with little effort. If you have a second person (even just a bystander) you can work really fast like this. No need for a fancy-pants boom, either. You can just use an extended light stand with the legs collapsed.
In the wide shot of Brian and goats above, the boom light works against the hard, streaming backlight coming from the sun. But given our ambient exposure, this would be way too contrasty without the use of the fill. The Ray Flash with the SB-800 was set to 1/2 power. Remember, the Ray Flash is going to eat up some light. So the net effect is a pretty good balance between the two because the fill-to-subject distance is also greater than that of the key.
One quirk about the Ray Flash is that it gives up a little angle of coverage to get its efficiency, which in this case is doubly helpful. I was able to feather it up a little to keep from overexposing the foreground goats.
And as long as Erik keeps his flash to a constant distance from my subject, this setup travels very well using manual mode all around. Light stands would not last five minutes with these guys. Who knows -- those flashes might be tasty…
 Using this setup, we were also able to follow the goats as they wandered around in what would have otherwise been extreme patchy ambient backlight. Here we just went with Nikon's built-in CLS/TTL. (See? I can be flexible.) We used an on-camera flash as both the on-axis fill and the master light, combined. Fill was set to -2.0 stops from full TTL, with the boomed key light running at full TTL. Worked pretty well, too.
The important thing is the key light location. You'll be nudging your VAB into the lighting locations you want until they start to get it intuitively -- which Erik did pretty quickly.
 We wanted to do something with a different look with Brian, so we turned around and shot him using the river as the backdrop.
He would be in full sun, if he were not being shaded by the trees behind me. And by keeping the key light and ambient light all coming from a similar direction, you can build a nice, logical lighting scheme. (Of course, you can cheat it a little with fill and a kicker, too.)
Use the shade to knock out the sun, then build the key and shaping lights until he looks the way you want. That way, the light in the background has a directional consistency that makes it look kinda natural, but juiced.
We placed the lights in this photo one at a time, starting with the ambient. First we went to a low ISO and set the shutter to a 250th. Then we dialed in the aperture that made the background look nice and saturated. I think we were underexposing it, like, a stop-and-a-half maybe.
This, of course, places Brian in a black hole. So we just build him back up one light at a time. (All in manual mode here. Everything is locked in -- the light is not gonna change.)
There are three lights going on -- all SB's. Try to reverse them before reading further if you want. Spoilers ahead.
_________
Key is kinda obvious, I guess. It is coming from high camera right, about 5 feet away. Power level? No idea. Maybe around a quarter or so. Doesn't matter -- the idea is just to dial it in until he looks good. We set it on a 105mm zoom and feathered it up a little, which gave us a nice falloff down his torso.
Second light is subtle, but important for shape. It is a back/right kicker, also zoomed to 105mm and dialed down until it just skims Brian's head and gives it a nice, 3-d look. Not too much power on this light is the secret. (Look at the photo bigger to see the subtle kicker at work.)
The third light needs to fix the shadow depth from the key, so it is coming in from low camera left. Erik is just holding it. We PW'd the first two lights and slaved (using SU-4 mode) the fill. It is subtle because it is set to a nice, low level. (Again, just add salt to taste.) But if you just look above Brian's camera-left collar you can see how much of a black hole the shadows would be without it.
Controlling the shadow depth from the key light is what makes those hard, sculpting lights look good. This also give us power to burn (at reasonable working distances) with the SB's. You could not do this very well with light-sucking umbrellas.
"Cue the Fill Goat!"
 This last one is a straight ambient shot, using the streaming sunlight from back camera right and a very convenient fill goat from from camera left. I was amazed at how much she filled Brian's face from that distance.
 But I'll sure take it.
Most of the day was handled with patchy backlit ambient and just two SB's. Nothing real fancy, and we did not use a single light softener the whole time. That was possible because we were mindful of the fill light, which allowed us to lift up the shadows cast by the hard key.
And I am already thinking of using these guys to go after that big patch of poison ivy (goats love it) that will otherwise make the woods in our backyard all but unusable next spring.
black dynamite

What I would give to have a little extra space, in this little beach bungalow. A butler's pantry perhaps. Or maybe a china closet. Something 10 x 8 ish, with a french door and a crystal doorknob.
A place where I could stand, chin between forefinger and thumb surveying my stash, pieces collected over years of wading through tag sales, picking through flea markets and second hand stores.


Of course, they'd all be arranged by color, placed on lined shelves, random clutches of silver flatware, in parfait glasses...you've know the drill. Maybe I'd even arrange them seasonally.
If I had an autumnal area, before my purple transfer ware {brought out at Thanksgiving} would have to sit a collection of Wedgwood Basalt, which of course, would be used over and over again throughout the month of October {although I once read that Charlotte Moss mixed hers with a pale pink linen but that's an entirely other closet }


Basalt Ware, sometimes called Black Basalt, is a hard black vitreous Stoneware, named after the volcanic rock Basalt and manufactured by Josiah Wedgwood from about 1768. Wedgwood's Black Basalt Ware was an improvement on the stained earthenware known as Egyptian Black made by other Staffordshire potters.
Subscribe to:
Posts (Atom)